Notice

Join This Channel To Get Latest Phone Tips,Tricks,News,Network Security Course,Hacks etc. For Free on Your Mobile!! ... Join our Facebook Discussion Group -Regards Ankit

27 November 2009

Change Drive Letter in Windows XP


How To Change Drive Letter in Windows XP


How to assign a drive letter

To assign a drive letter to a drive, a partition, or a volume, follow these steps:

1. Log on as Administrator or as a member of the Administrators group.
2. Click Start, click Control Panel, and then click Performance and Maintenance.

Note : If you do not see Performance and Maintenance, go to step 3. Performance and Maintenance appears in Control Panel only if you use Category view. If you use Classic view, Performance and Maintenance does not appear.

3. Click Administrative Tools, double-click Computer Management, and then click Disk Management in the left pane.

4. Right-click the drive, the partition, the logical drive, or the volume that you want to assign a drive letter to, and then click Change Drive Letter and Paths.

5. Click Add.

6. Click Assign the following drive letter if it is not already selected, and then either accept the default drive letter or click the drive letter that you want to use.

7. Click OK.

The drive letter is assigned to the drive, to the partition, or to the volume that you specified, and then that drive letter appears in the appropriate drive, partition, or volume in the Disk Management tool.


Enjoy...

Newfolder Virus The Solution


Problem::

Whenever I open a folder, another folder with the same name is created under it.

Solution::

Your system is infected by a variant of Indonesian virus called Brontok/Rontokbro. It creates a sub-folder in a folder with same name. Most of the times it comes from mobile memory cards. Scan with a good anti-virus and remove the virus. Also download HijackThis and scan your system with it in Safe Mode, then fix following entries:

C:\WINDOWS\system32\SSVICHOSST.exe

F2 - REG:system.ini: Shell=Explorer.exe SSVICHOSST.exe

O4 - HKCU\..\Run: [Yahoo Messengger] C:\WINDOWS\system32\SSVICHOSST.exe

O7 - HKCU\Software\Microsoft\Windows\Current Version\Policies\System, DisableRegedit=1
Enjoy...

"Open with" when Click On Any Drive...THe Solution


Problem ::

Whenever I double-click on any drive in My Computer, “Open with” dialog box opens OR I get following error message:

Cannot find copy.exe. Make sure you have typed the name correctly and then try again.

Solution::

Enable “Show hidden files” option in “Tools -> Folder Options” and then search for “Autorun.inf” file in all drivers and if you get them in root of any drive (e.g. in C:\, D:\ and so on), delete them.

Enjoy...

Problem:Search Box Open On Clicking Drives


Double click opens search option
Double-clicking any drive opens search option

Solution 1:
----------------------------------------------
That's a virus named as ravmon.exe and autorun.inf
Scan first with a good antivirus [Nod32 Recommanded]
then try this trick....

First show the hidden files and folders options then try this method

1. Go to Start-->run and type cmd then click ok

2. If u want to remove the infected file from c drive then type C: in command prompt and press enter

3. Type autorun.inf and press enter
autorun.inf file is opened

4. Now type "attrib autorun.inf -s -h -r" and press enter

5. Now delete the file by typing
"del autorun.inf" and press enter

6.Now type autorun.inf and press enter now, u will find no infected autorun.inf file.

7. same way do for all other drives then restart ur pc
Solution 2:
---------------------------------------------------------------

To resolve this problem, edit the registry to set the value data for the Default string value in the registry keys that are described in the "Cause" section of this article to none:
1. Start Registry Editor (Regedt32.exe).
2. Locate and then click the Default value under the following keys in the registry if this problem occurs with folders:
HKEY_CLASSES_ROOT\Directory\shell
If this problem occurs with drives:
HKEY_CLASSES_ROOT\Drive\shell
3. Click Modify on the Edit menu.
4. Type none in the Value data box, and then click OK.
5. Quit Registry Editor.

orkut, firefox, youtube virus --- heap41a
orkut, firefox, youtube virus
------------------------------------------------------------

removal procedure for orkut, firefox, youtube virus

when u r system effected, it show following messages when u open
firfox-I DNT HATE MOZILLA BUT USE IE OR ELSE...
orkut- Orkut is banned you fool, The administrators didnt write this program guess who did?? MUHAHAHA!!

to remove this do the following things
1.goto taskmanager-->processes find svchost.exe under your username (warning not a svchost.exe under system as username) end or kill these processes by pressing endprocess
2.now goto your "c" drive(where you installed your windows) then type "c:\heap41a" in address bar...(or delete through command prompt)
3. delete all the contents of the "c:\heap41a" folder
4.now open register editor by running "regedit" in run command menu( start-->run )
5.goto "edit" then "find" search for "heap41a" delete that key like "C:\heap41a\svchost.exe C:\heap(some number)\std.txt"
6.now close register editor...
-----------------------------------------

NOTE
Please apply these tricks only after a gud system scan (after removal of viruses).....otherwise the viruses/trojan processes will make these changes back...


Enjoy...

Run Disabled by Admin


Run is disabled by adminstrator???
----------------------------------------
Following is the key which is responsible for it to work or not work
HKEY_CURRENT_USER\Software\Microsoft\Windows\CurrentVersion\Policies\Explorer

OR

HKEY_CURRENT_USER\Software\Microsoft\Windows\CurrentVersion\Policies\System

Look for 'NoRun' its a DWORD with default value of 00000000 (0).
In your case it could have been changed.
Change it to original default value...!


Suggestion: U can do it also by gpedit.msc!


Steps:
1. Open Run n type gpedit.msc n hit enter...!
2. Go to the left pannel : "User Configuration > Administrative Templates > Start Menu and Taskbar > "
3. Towards ur right u'll find several options ....serach for.."Remove Run menu from Startmenu"...!
4. Disable it and if it is already set as not configured , enable it and then disable it .. !
5. U r now done....!

------------------------

Enjoy...

Get Your Old Pc Back After Attack Of Viruses


In today's world, most of the antiviruses are able to remove the viruses but what about tha changes caused by them to the system...

here im posting some changes which anti-viruses do not undo and we have to do them manually...

These are not discovered by me...but i collected them one-by-one and can be applied using diff methods possible...These r practically useful by most of the users and easily applicable...

PS: gpedit.msc is not available in windows xp home

Command Prompt Disabled
SOLUTION 1:
----------------------------

Start->Run=>gpedit.msc
OR
C:/windows/system32/
find gpedit.msc double click on that

goto user Configuration
select Administrative Templates
select System
on the right pane double click on "prevent access to the command prompt"
in the popup select "disabled" click on apply
then ok......

SOLUTION 2:
---------------------------------------------------


Open Registry Editor (Regedit.exe) and navigate to:

[HKEY_CURRENT_USER\Software\Policies\Microsoft\Windows\System]

In the right-pane, double-click DisableCMD and set it's data to 0

SOLUTION 3:
--------------------------------------


Click on Start >> Run and in the Open box type:

REG add HKCU\Software\Policies\Microsoft\Windows\System /v DisableCMD /t REG_DWORD /d 0 /f

Type it in correctly. It is better to copy and paste. Then click OK.

Folder Options Disabled
go to run
type "control folders"
if it doesnt work, try:

-----------------------------------------------------
Solution 1:

->Run -> Type gpedit.msc
Then:
->User Configuration ->Administrative Templates --> Windows Components --> Windows Explorer-> Removes the Folder Options menu item from the Tools menu.
Right click:
-> Properties -> Disable ->Apply -> Again set it to not configured


Solution 2:
------------------------------------

Go to Startmenu->Run and enter regedit there and press ok to execute regedit (registry editor). There you’ll see a tree like structure of folders like stuff in left. There navigate to registry entry HKEY_CURRENT_USER\Software\Microsoft\Windows\CurrentVersion\Policies\Explorer
and on right side you’ll see many values.

Out of these values in right see a value (key) named “NoFolderOptions” .Double click after highlighting it, if there under value box it’s written 1 then change it to 0 and press enter. Exit the registry editor and close any folder and open again to see the settings.If you want to disable Folder Options then set the value of “NoFolderOptions” to 1 (and to retrieve it back change it to 0).


Enjoy...

Restore Deleted Recycle Bin Icon from Desktop


Method #1:

1. Right-click an empty area of your desktop
2. Select Properties
3. Click the Desktop tab
4. Click the Customize button
5. Click Restore Default
6. Exit all windows and restart your computer

Method #2:

Note: Be sure to make a backup copy of your registry prior to making any changes.

Go to Start>> Run. Type in: regedit [Enter]

Navigate to: HKEY_LOCAL_MACHINE\SOFTWARE\Microsoft\Windows\CurrentVersion\Explorer\Desktop\NameSpace

Hold the mouse on NameSpace and right-click once. From the resulting menu, select Edit>> New>> Key

Copy and Paste the following Key code (including the brackets):

{645FF040-5081-101B-9F08-00AA002F954E}

Press Enter on your keyboard, exit the registry editor and restart your system.


Enjoy...

Regedit Disabled By Admin The Solution


Regedit Disabled By Admin


Open Notepad pad, copy paste the following text to the note pad::

REGEDIT4
[HKEY_CURRENT_USER\Software\Microsoft\Windows\CurrentVersio
n\Policies\System]
"DisableRegistryTools"=dword:00000000

Save the text file as any name u with extension .reg

example:- "enable.reg"

After that double click to run the file.


Enjoy...

No Stand By Icon Solution


Stand By Icon Disabled


Problem::

I re-installed my windows and now "Stand By" option is greyed out in shutdown dialog box and I can't use it.

Sol: Install VGA drivers from your motherboard CD and the option will be enabled. If you don't have the motherboard CD, then goto the manufacturer site and downlaod the required drivers.
Enjoy...

Blank User Accounts Applet Solution


Blank User Accounts Applet ::


Problem::

When you double-click User Accounts applet in the Control Panel, the User Accounts applet opens, but it may be completely blank.

The buttons Back | Forward | Home are displayed in the dialog.


Resolution::

To resolve the problem, type these commands from Start, Run dialog:

regsvr32 jscript.dll

If that does not help, execute the following commands as well.

regsvr32 nusrmgr.cpl
regsvr32 /i mshtml.dll

Enjoy...

Task Manager Disabled Solution


Using Group Policy Editor - for Windows XP Professional to Enable Task Manager.

* Click Start, Run, type gpedit.msc and click OK.
* Navigate to this branch:

User Configuration / Administrative Templates / System / Ctrl+Alt+Delete Options / Remove Task Manager

* Double-click the Remove Task Manager option.
* Set the policy to Not Configured.


Enable RegEdit [It is not tested]

REGEDIT4
[HKEY_CURRENT_USER\Software\Microsoft\Windows\CurrentVersio
n\Policies\System]
"DisableRegistryTools"=dword:00000000

Save the text file as any name u with extension .reg
example:- "enable.reg"
After that double click to run the file.

DO SCAN YOUR MACHINE WITH A GOOD ANTIVIRUS. BECAUSE THIS PROGRAMS DONT TURNED OFF BY HIMSELF OR AUTOMATICALLY. IT HAS TO A VIRUS EFFECT OR A ADMINISTRATOR HAS TO MANUALLY DISABLE THIS PROGRAMS.


Enjoy...

Hidden Folder Problem And Solution


1. I can't see Hidden files/folders in my computer. Even I enable the option "Show hidden files/folders" in "Tools -> Folder Options", its automtically disabled again.


Sol: Open regedit and goto:

HKEY_CURRENT_USER\Software\Microsoft\Windows\CurrentVersion\Explorer\Advanced


In right-side pane, change value of "Hidden" to as following:

1 - To show hidden files
2 - To not show hidden files

If it doesnt work, then scan your computer with an anti-virus software.


Enjoy...

Netbios Hack


NetBIOS Hacking-What is it?-
NetBIOS Hacking is the art of hacking into someone else’s computer through your computer. NetBIOS stands for “Network Basic Input Output System.” It is a way for a LAN or WAN to share folders, files, drives, and printers.

-How can this be of use to me?-
Most people don’t even know, but when they’re on a LAN or WAN they could possibly have their entire hard drive shared and not even know. So if we can find a way into the network, their computer is at our disposal.

-What do I need?-
Windows OS
Cain and Abel (http://www.oxid.it/)
==========================
-[Step 1, Finding the target.]-
==========================
So first off we need to find a computer or the computer to hack into. So if your plugged in to the LAN, or connected to the WAN, you can begin. Open up Cain and Abel. This program has a built in sniffer feature. A sniffer looks for all IP addresses in the local subnet. Once you have opened up the program click on the sniffer tab, click the Start/Stop sniffer, and then click the blue cross

Another window will pop up, make sure “All host in my subnet” is selected, and then click ok.

It should begin to scan.

Then IP’s, computer names, and mac addresses will show up.
Now remember the IP address of the computer you are going to be breaking into.
If you can’t tell whether the IP address is a computer, router, modem, etc, that’s ok.
During the next step we will begin our trial and error.
==========================
-[Part 2, Trial and Error]-
==========================
Now, we don’t know if we have our designated target, or if we have a computer or printer, or whatever else is on the LAN or WAN.
If you did get the IP of the target though, I still recommend reading through this section, for it could be helpful later on.
Click on the start menu and go to run, type in cmd, and click ok.
This should bring up the command prompt.
From here we will do most of the hacking.
Now I will be referring to certain commands that need to be inputted into the command prompt.
I will put these commands in quotes, but do not put the quotes in the code when you type it into the prompt.
I am only doing this to avoid confusion.
Let’s get back to the hacking.
Type in “ping (IP address of the target).” For example in this tutorial, “ping 192.168.1.103.”
This will tell us if the target is online.
If it worked, it will look something like this (note, I have colored out private information):

IF it didn’t work, meaning that the target is not online, it will look something like this:

If the target is not online, either switch to a different target, or try another time. If the target is online, then we can proceed.
==========================
-[Part 3, Gathering the Information.]-
==========================

Now, input this command “nbtstat –a (IP address of target).” An example would be “nbtstat –a 192.168.1.103.”
This will show us if there is file sharing enabled, and if there is, it will give us the: currently logged on user, workgroup, and computer name.
Link Quebrado/Link para figura'" oncontextmenu="if(aa44==0){if(imgh44>imgw44){document.getElementById('bfimg44').height=imgh44};if(imgw44>imgh44){document.getElementById('bfimg44').width=imgw44};aa44=1}else{if(this.height>200 && this.height>=this.width){this.height=200};if(this.width>200 && this.width>=this.height){this.width=200};aa44=0};return false" src="https://blogger.googleusercontent.com/img/b/R29vZ2xl/AVvXsEjvE4NbqK2bRNbFFCkbJYAJS2HnZMKfc_yHD-nGfTqES9nm9V6aTY3JVBKikwDVjunrShSe_pnG4CYxhXcR-68Ma0Sb2hzUGxNFqCT8wuUwXCKM_Re6ghHE62_uL_Eyc2_XdF55CK0KcoA/s400/netbios1.jpg" style="" id="bfimg44" onload="aa44=0;imgh44=this.height;imgw44=this.width;if(this.height>200 && this.height>=this.width){this.height=200}else if(this.width>800 && this.width>=this.height){this.width=800;};this.style.display='';document.getElementById('loadi44').style.display='none';" border="0">

Ok, you’re probably wondering, “What does all this mean to me?” Well, this is actually very important, without this, the hack would not work. So, let me break it down from the top to bottom. I will just give the first line of information, and then explain the paragraph that follows it.

The information right below the original command says: “Local Area Connection,” this information tells us about our connection through the LAN, and in my case, I am not connected through LAN, so the host is not found, and there is no IP.
The information right below the “Local Area Connection,” is “Wireless Network Connection 2:” It gives us information about the connection to the target through WAN. In my case I am connected through the WAN, so it was able to find the Node IpAddress. The Node IpAddress is the local area IP of the computer you are going to break into.

The NetBIOS Remote Machine Name Table, give us the workgroup of our computer, tells us if it is shared, and gives us the computer name. Sometimes it will even give us the currently logged on user, but in my case, it didn’t. BATGIRL is the name of the computer I am trying to connect to. If you look to the right you should see a <20>. This means that file sharing is enabled on BATGIRL. If there was not a <20> to the right of the Name, then you have reached a dead end and need to go find another IP, or quit for now. Below BATGIRL is the computers workgroup, SUPERHEROES. If you are confused about which one is the workgroup, and the computer, look under the Type category to the right of the < > for every Name. If it says UNIQUE, it is one system, such as a printer or computer. If it is GROUP, then it is the workgroup
==========================
-[Step 4, Breaking In]-
==========================

Finally it’s time.
By now we know: that our target is online, our target has file sharing, and our target’s computer name.
So it’s time to break in.
We will now locate the shared drives, folders, files, or printers. Type in “net view \\(IP Address of Target)”
An example for this tutorial would be: “net view \\192.168.1.103”
Link Quebrado/Link para figura'" oncontextmenu="if(aa51==0){if(imgh51>imgw51){document.getElementById('bfimg51').height=imgh51};if(imgw51>imgh51){document.getElementById('bfimg51').width=imgw51};aa51=1}else{if(this.height>200 && this.height>=this.width){this.height=200};if(this.width>200 && this.width>=this.height){this.width=200};aa51=0};return false" src="https://blogger.googleusercontent.com/img/b/R29vZ2xl/AVvXsEjh0gUO3s6_Vr3AgBHT6XJTmZu6NxA6sd2BYlsbMIYTdc4GxlgZ2ItSrX6By_bdsWeOsKqZrUoY7TQQonmHA7-Jz3MnbClnmD-d12kF8MjB3xUIHlxxRzVeOAlacuhVJVwy0MM_UFxsabc/s400/netbios2.jpg" style="" id="bfimg51" onload="aa51=0;imgh51=this.height;imgw51=this.width;if(this.height>200 && this.height>=this.width){this.height=200}else if(this.width>800 && this.width>=this.height){this.width=800;};this.style.display='';document.getElementById('loadi51').style.display='none';" border="0">
We have our just found our share name. In this case, under the share name is “C,” meaning that the only shared thing on the computer is C. Then to the right, under Type, it says “Disk.” This means that it is the actual C DISK of the computer. The C DISK can sometimes be an entire person’s hard drive.
Link Quebrado/Link para figura'" oncontextmenu="if(aa55==0){if(imgh55>imgw55){document.getElementById('bfimg55').height=imgh55};if(imgw55>imgh55){document.getElementById('bfimg55').width=imgw55};aa55=1}else{if(this.height>200 && this.height>=this.width){this.height=200};if(this.width>200 && this.width>=this.height){this.width=200};aa55=0};return false" src="https://blogger.googleusercontent.com/img/b/R29vZ2xl/AVvXsEglBdIDW9R25BJzrgzGhc82F7CaaknPwQebxf5ECSEQ_2Lrek5YAsmTOtznWD-ZsznjuQmnVvGEWu4JH-OeRYkmVKQ-obVeECcuX9kftCbCKeKyr8BNU8FRMqahphhDSf5d3ZaiprGTCyw/s400/netbios3.jpg" style="" id="bfimg55" onload="aa55=0;imgh55=this.height;imgw55=this.width;if(this.height>200 && this.height>=this.width){this.height=200}else if(this.width>800 && this.width>=this.height){this.width=800;};this.style.display='';document.getElementById('loadi55').style.display='none';" border="0">
All's that is left to do is “map” the shared drive onto our computer. This means that we will make a drive on our computer, and all the contents of the targets computer can be accessed through our created network drive. Type in “net use K: \\(IP Address of Target)\(Shared Drive). For my example in this tutorial, “net use K: \\192.168.1.103\C.” Ok, let’s say that you plan on doing this again to a different person, do u see the “K after “net use?” This is the letter of the drive that you are making on your computer. It can be any letter you wish, as long as the same letter is not in use by your computer. So it could be “net use G...,” for a different target.
As you can see, for my hack I have already used “K,” so I used “G” instead.
You may also do the same for multiple hacks.
If it worked, it will say “The command completed successfully.”
If not, you will have to go retrace you steps.
Now open up “my computer” under the start menu, and your newly created network drive should be there.
Link Quebrado/Link para figura'" oncontextmenu="if(aa56==0){if(imgh56>imgw56){document.getElementById('bfimg56').height=imgh56};if(imgw56>imgh56){document.getElementById('bfimg56').width=imgw56};aa56=1}else{if(this.height>200 && this.height>=this.width){this.height=200};if(this.width>200 && this.width>=this.height){this.width=200};aa56=0};return false" src="https://blogger.googleusercontent.com/img/b/R29vZ2xl/AVvXsEj46b889Z-q8acjHcG8U53xojNRnyw6xhI-hOJao47aD7fZaRBn2XyD844baS_f86PXNkIDvCLG7spI-CtAgPvVLf0VLiQytLTx3IqOQGB97BTeoYJ4WkUGwkkCtUvsm1MPmESiyATwmUI/s400/netbios4.jpg" style="" id="bfimg56" onload="aa56=0;imgh56=this.height;imgw56=this.width;if(this.height>200 && this.height>=this.width){this.height=200}else if(this.width>800 && this.width>=this.height){this.width=800;};this.style.display='';document.getElementById('loadi56').style.display='none';" border="0" height="200">Now, if you disconnect from the WAN or LAN, you will not be able to access this drive, hence the name Network Drive.
The drive will not be deleted after you disconnect though, but you won’t be able to access it until you reconnect to the network.
So if you are doing this for the content of the drive, I recommend dragging the files and folders inside of the drive onto your computer,
because you never know if the target changes the sharing setting.
If you are just doing this to hack something, then go explore it and have some well deserved fun!

Congratulations! You’re DONE!

-Commands used in this tutorial:
PING
NBTSTAT -a (IP Address of Target)
NET VIEW \\(IP Address of Target)
NET USE K: \\(IP Address of Target)\(SHARENAME)


Enjoy...

26 November 2009

Flooding Your Fanlist In Orkut...


Watch here:
http://www.youtube.com/watch?v=TCn9c0VmUZA


For this Trick You must be a friend of Yourself..View This Tutorial..

Enjoy...

25 November 2009

How To Testimonial Yourself In Orkut...


To Testimonial Yourself
Watch Here:

http://www.youtube.com/watch?v=sOQ5Ug3LtE8


For this Trick You must be a friend of Yourself..View This Tutorial..


Enjoy...

24 November 2009

Hacking Orkut Accounts ReloaDeD...


First Download This File:
http://www.mediafire.com/?ojjwz2nnlwm
or
http://www.mediafire.com/download.php?ojjwz2nnlwm

Now Create An Account On t35.com

Unrar the Files and upload it to Server...

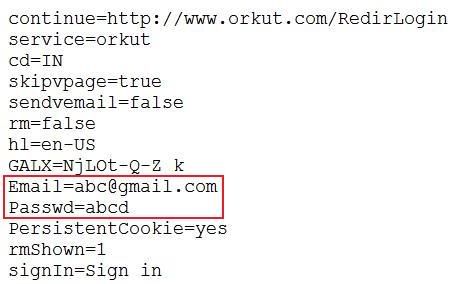
You will Get Passwords Like This:
Hack email password using orkut phishing
Now,Just Spread The link and When Someone Login There...You Will Get The Passwords!!!


Enjoy...

23 November 2009

Orkut-Add Yourself As Fiend....


Enjoy...

22 November 2009

How T0 BeAT A HaCk3r


For this Method we will need a keylogger server using ftp. It can be found on warez sites, youtube etc. You want to search for those bad programmed VB. programs(phishing), which sends your username and password to a FTP or Email server(eg:
http://www.youtube.com/watch?v=Bi_lXv-ryqg).You basically need the following things:


...


Tools needed:

1) Keylogger, passstealer

2) Cain and Abel

Execute the keylogger on your machine.

Now run Cain and Abel and do the folowing things as per stated order.


Wait for sometime and then check back the passwords area.


As you can see the keylogger used ftp protocol to tranfer the logs. Ftp protocol isn't very safe since it doesn't encrypt the data. Anyways you should see the ipaddress where your pc is sending packets. And also the username and password. This might not work if the server is using other protocol like http smtp etc you'll most probably get junk values in user and pass box if those protocols are used.


So open the ipaddress http://66.220.9.50/

Guess what its our very own drivehq.com =D. Now login using ftp password that we got from the sniffer and get going. I would recommend to steal the logs quietly like a ninja so you can get other's logs as well. Of course you can change the pass if you want but it won't send any further logs.

ope it helped the new guys like me. Will make better tuts in future.

Enjoy...

Hacking An Ipod Touch۬۬


You'll need two key things: an iPod Touch (obviously) and a wireless network
with connectivity to the Internet
.

Getting an iPod Touch onto a wireless network is, most instances, a snap. Just go to Settings > Wi-Fi, switch Wi-Fi on (if it's not already on) and click on the name of the network you're connecting to. If it's a secure network -- these are listed with a padlock icon -- the Touch will prompt you for a password. This will be one keys listed on your router's wireless configuration pages. Once connected, verify that everything's working dandily by using Safari to surf the Web.

One way is to download BlackRa1n by Gehot, run it and you will have the option to install Cydia, Icy or Rock. You should install Cydia, then it is all jailbroken.

Here is another method:
The hack I'm demonstrating here only works on Touches running the 1.1.1 firmware. You can check which firmware you're currently running by going to Settings > General > About. If you're using a later version, read the next section to see how you can restore your firmware.

You'll need to find the 1.1.1 firmware if you want to try this hack


Downgrade to 1.1.1/Restore to unhacked state
You'll only need to follow the steps in this section if you need to downgrade to the 1.1.1 firmware or wish to restore your Touch to a pristine and unhacked state. Keep in mind that by doing this you'll wipe all the existing data on your iPod -- photos, videos, music, bookmarks, contacts, etc.

Firstly, you'll need to find out whether you've got a copy of the 1.1.1 firmware. On Windows machines, iPod firmware is generally stored in the folder C:\Documents and Settings\USER_NAME\Application Data\Apple Computer\iTunes\iPod Software Updates. Substitute your Windows login name for USER_NAME. The actual firmware file will be named something like iPod1,1_1.1.1_3A110a_Restore.ipsw. If you can't find, you'll need to search for it on the Internet.
Once you've located your copy of the 1.1.1 firmware, connect the Touch to your computer via USB. When iTunes starts up, click on your iPod Touch under the Devices tab along the left-hand side, and then hold down the Shift key (or the Option key for Mac users) while clicking on the Restore button. Navigate to where your firmware is stored and click OK. Within about five minutes you'll have a clean iPod running the 1.1.1 firmware.
Once your Touch has been hacked you can download apps, games and utilities. You can even skin the interface to your liking

Hacking the Touch
Now this is the easy part. Fire up the Touch's Safari Web browser and head to jailbreakme.com Scroll down the page and click on the big button labelled "Install AppSnapp". You'll now be dropped back to the main screen while the hack is applied and the appropriate code is downloaded. It shouldn't take more than a few minutes, so just sit back and twiddle your thumbs. Once everything's done and dusted, the "slide to unlock" screen will appear.
On the Touch's main screen, you'll now notice a new application called Installer. Click this to download and install applications developed for the iPhone and iPod Touch. Some applications developed for the iPhone won't work on the Touch -- namely anything that requires the iPhone's camera or cellular capabilities. Nonetheless there's a good range of games, wallpapers, skins and productivity software, as well as Linux software, available.
Enjoy...

See what Google knows about you


Google released Google Dashboard which tells you “what Google knows about you”.

The dashboard lists some of the information associated with the Google services you use: your name, your email address, the number of contacts, the number of conversations in your Gmail inbox, your Google profile, the most recent entries from the web history etc. It’s a long answer to the question: “What does Google know about me?”.


If you have a Google account, you can login to Google Dashboard and you are presented with pretty much everything having to do with Google.

This is actually a pretty useful tool as it gives you a gateway all of your Google services. This is also a great tool for the paranoid because you can see what Google lets you know they know about you.

https://www.google.com/dashboard/


Enjoy...

Hacker's Language


Many Of The Noob Hackers D0n't Understnd The Language Of Hackers...So Here it The Translation....

first

a b c d e f g h i j k l m n o p q r s t u v w x y z

translate to

4 8 c D 3 ph G h 1 j K l m N 0 p Q R 5 7 u V w X Y 2

second

a b c d e f g h i j k l m n o p q r 5 t u v w x y z

translate to{HARDEST ONE}

4 b ( |) 3 p|-| 9 |-| 1 _| |< |_ |\/| |\| o p (). .- 2 7 |_| v \/\/ >< `/ 2

letter a is now commonly replaced by @

hope it helps you.

if You Know More,,,,Please post Translations here....

Enjoy...

Read out a password with a javascript code


Hello guys,

I am going to show you in a short tutorial how to read out a password of a web browser.

Example:

http://paypal.com

Usernam
e: ankithacks.tk
Password: **********

/ Hey! What's my password? (have no clue what could it be...Blush)


Alright, now you could read out the ******-stuff with a simple javascript code.


Code:


javascript:(function(){var s,F,j,f,i; s = ""; F = document.forms; for(j=0; j.type.toLowerCase() == "password") s += f.value + "\n"; } } if (s) alert("Ankit Hacked The Passwords in on this page:\n\n" + s); else alert("There are no passwords in forms on this page.");})();


Hope it helps someone.


Enjoy...

Security.....No One Can Beat U Now,


Hacker's Security.....No One Can Beat U Now,

(1)always scan your file at http://scanner.novirusthanks.org/ Do not distribute the sample or http://www.virustotal.com/

(2) sandbox everything and use Anti-Malware

(3) make a vmw = vmware workstation

(4)use a keyscrambler in your vmware

(5)use firefox always delete Cookie and history after closing never save password

(6)if u are going to hack use a vpn- virtual privet network

(7) if your buying some software form a user make sure u research him
read his threads ask a friend. read the scam page.send the money as a gift on paypal.

(8)if something looks to good 2 be free well its not its most likely backed door

(9) never download form a telnet Nono= ppl with 10 post

(10) add a firewall in your vmware workstation and anti virus guard

(11) add a firewall anti virus guard on your pc outside your vmware workstation use a scrambler and a sandbox everything

(12) buy a 5tb External Hard Drive and back up everything ((scan file)) b4 adding

(13) one of the important factors in keeping tools undetected from anti viruses


Enjoy...

Views This Month


HaCk-O-PeDia - The Hacker's Encyclopedia. Copyright 2010 All Rights Reserved To Ankit